Cinnamon Buttercream Frosted Pumpkin Cookies

Here’s a pro tip: if you’re obsessed with the smell of pumpkin, and apples, and spices, and all things fall, but are still trying to overcome a pathological fear of candles, learn to bake.

Don’t get me wrong, I desperately wish I could be that girl who fills her entire house and bedroom with delicious-smelling candles, and yet every time I try my anxiety rears its ugly head, screaming something along the lines of YOU MORON WHAT IF YOU KNOCK ONE OVER AND SET THE WHOLE DAMN THING ABLAZE. Seriously. I can’t even go to sleep with my AUTOMATICALLY-TIMED essential oil diffuser left running, BECAUSE ELECTRICAL FIRE. The fact that it would turn itself off after 30 minutes is neither here nor there.

Anyway.

Last weekend was Oregon football’s first away game, and what’s more quintessentially “fall” than making your house smell like pumpkin and spices with the sound of screaming fans coming out of your television (okay, computer) screen?

Thus, I present to you: Cinnamon Buttercream Pumpkin Cookies!

Recipe by: Two Sisters Crafting

Processed with VSCO with c1 preset

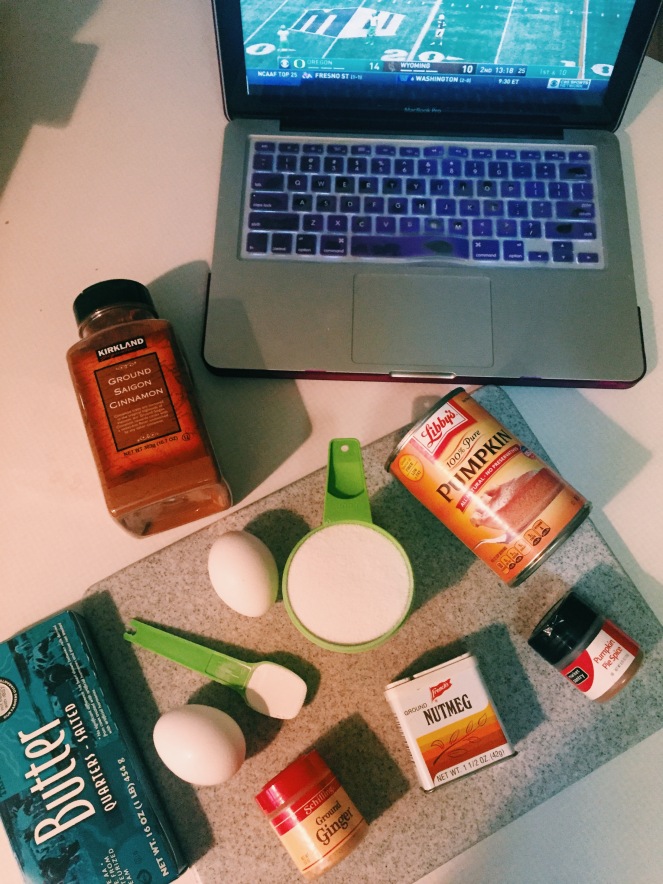
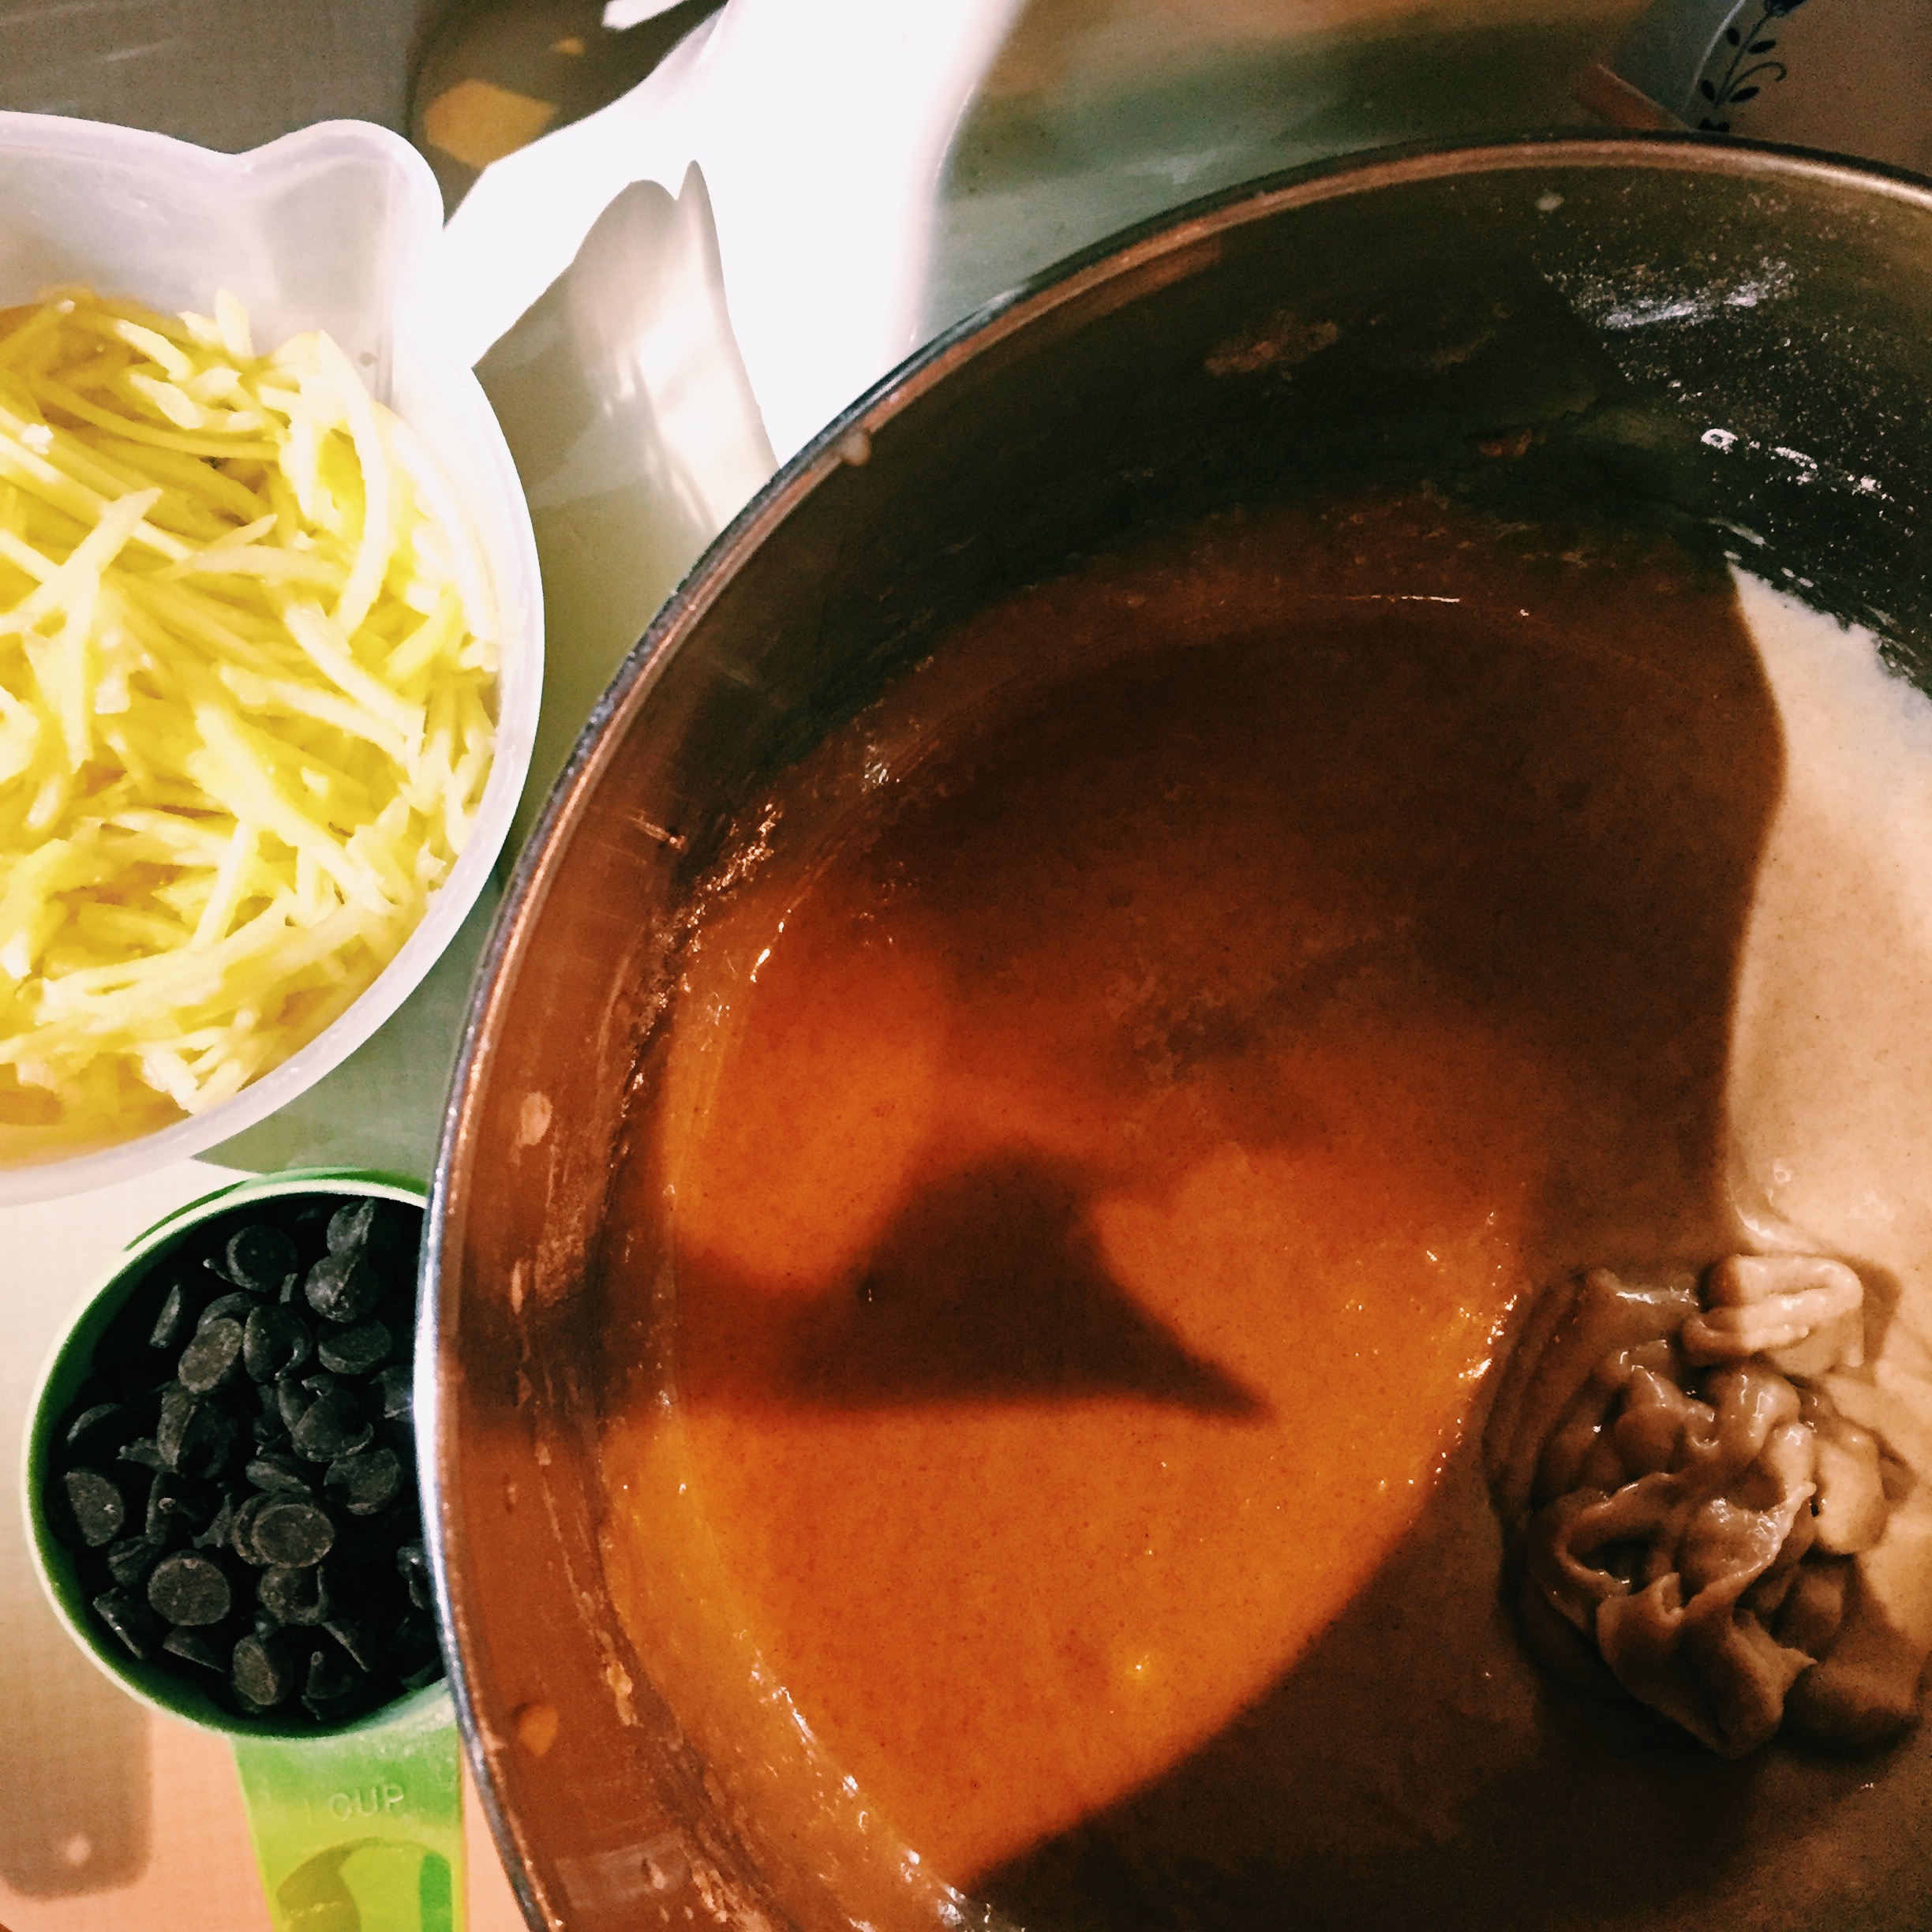
You’ll want to start by gathering all of your cookie ingredients and trying not to stress too much that Oregon is only up four points to a team they should be slaughtering.

Blend together the butter and sugar before adding pumpkin purée and eggs, and mix until light and creamy. I would recommend waiting until the butter is close to room temperature before blending—the original recipe didn’t specify, and of course me being me I didn’t put two and two together until my sugar/butter came out 75% too chunky.

(I hate that word.)

Next, sift your flour, baking powder, salt, and spices together and blend into the cookie batter.

Processed with VSCO with c1 preset

If at this point you’d like to add a cup of chopped walnuts or pecans, you totally could. I chose not to because I didn’t think it’d be as aesthetically pleasing, but you do you. It’d still taste good.

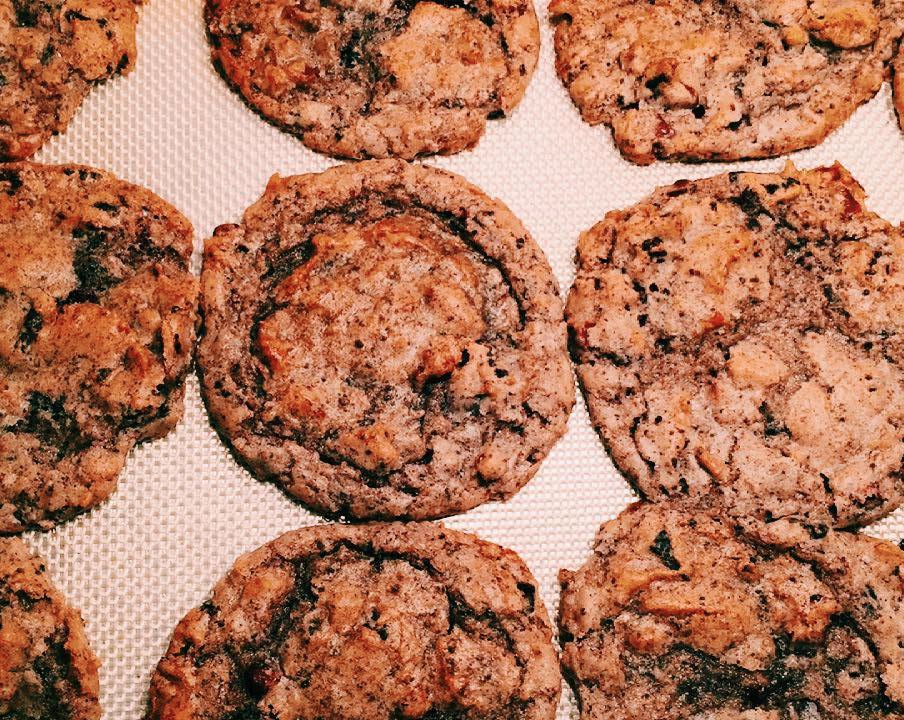
Once your dough is prepped, drop a spoonful of batter onto a sprayed cookie sheet, or silicone baking mat, like I use. Bake at 350 F for about 15 minutes (I did mine for 13 and a half, since my oven is on the warmer side).

After your first batch is out of the oven you can start working on the frosting, since you’ll want the cookies to be significantly cooler before you put any toppings on. Trust me, I learned this the hard way. Runny, melted frosting is the worst.

I will say right off the bat that this frosting is delicious with a capital delish. This recipe made me about twice as much as I actually needed, but there are worse problems to have.

Beat the cream cheese, butter, and vanilla extract in a mixer until smooth and creamy. Add powdered sugar a single cup at a time and continue to mix until sugar is incorporated. Lastly, add the cinnamon.

Now…FROST!


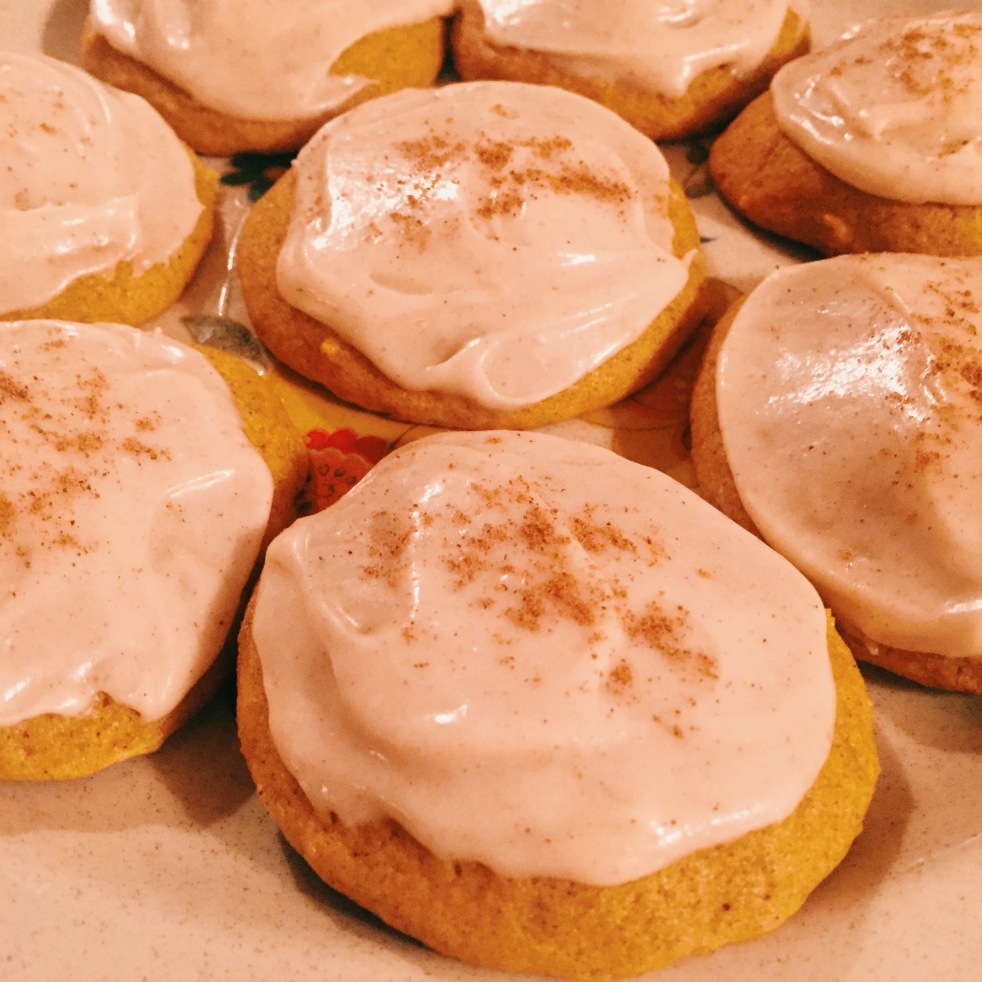
Finally, I followed the recipe to a “T” and sprinkled a pinch of nutmeg on top for a little extra spice.

Way worth it.

Cinnamon Buttercream Frosted Pumpkin Cookies

Cookie Ingredients

1/2 cup butter (sweet cream salted)

1 cup sugar

2 eggs

1 cup canned, 100% pure pumpkin

2 cups flour

4 tsp baking powder

1 tsp salt

2 1/2 tsp cinnamon

1/2 tsp nutmeg

1/4 tsp ginger (or pumpkin pie spice)

1 cup chopped walnuts or pecans (optional)

Cinnamon Buttercream Frosting Ingredients

1/2 cup butter (sweet cream salted)

8 oz cream cheese

3 tsp vanilla

4 cups powdered sugar

1 tsp cinnamon

A pinch of nutmeg over each frosted cookie

Method

  1. Cream together butter and sugar until light and fluffy.
  2. Add eggs and pumpkin and mix well.
  3. Sift flour, baking powder, salt, and spices, and blend in with cookie batter.
  4. Optional: Add walnuts or pecans and mix well.
  5. Using cookie dough scoop, drop a spoonful of dough onto the baking sheet. You should be able to fit a dozen on one sheet.
  6. Bake at 350 F for 15 minutes.

Frosting

  1. Beat cream cheese, butter, and vanilla in a mixer until blended.
  2. Add powdered sugar a cup at a time and continue to mix until sugar is fully incorporated.
  3. Add cinnamon.
  4. Once cookies are individually frosted (I used a butter knife to do so), sprinkle a pinch of nutmeg onto each cookie.

BOOM. It’s like fall in your mouth.

xoxo,

Erin


Nice to meet you.

Ever since Instagram came around, it’s kind of become an unwritten rule of mine to not post #tbt pictures from 2008 to 2011—the height of my eating disorder. This picture is from spring of 2010, right before I graduated from high school, and here are my initial thoughts when I look at it: chubby cheeks. Double chin. Bad skin. Hands awkwardly “hiding” my hips, where I carried all my extra weight. Leg bent so I can’t feel my thighs touching, a reminder of their excess fat. And, girl, WHERE is your sense of fashion?

[Disclaimer: I do want to say before sharing the rest of this post that eating disorders manifest themselves in all different shapes and sizes. This is me in the thick of mine. But no matter how anxious, depressed, or uncomfortable I felt, and even though I wasn’t a size zero, I acknowledge that I still had some semblance of “thin privilege,” and because of that I had the privilege of walking through life only being labeled by me. I’ll post more on that later. Anywho.]

I love to see people posting the “after” photos of their ED journey. I love hearing about all the confidence or self-love they’ve achieved, or self-realization they’ve had, or battles they’ve won against therapy, etc etc. I’ve certainly done my share of that.

But today I want to break my unspoken rule and post a “before” photo. I want to retrain my brain to see pictures like this and rather than think of words like “ugly” or “fat”—words that my disordered brain thought were the absolute worst thing I could be—think of these pictures as a pivotal part of my life’s journey. If I hadn’t experienced what I did then, I would not be where or who I am today. I would not appreciate how hardcore and special our bodies really are. How it’s (for the most part) literally built to take care of you if you take care of it.

I was going to post this photo alongside a current selfie, but then I thought, would that really help? Or would it just allow me to keep labeling the “after” vs. “before” as “better” vs. “worse?” And honestly, I am so fucking tired of hating myself. It’s dumb. And overrated. And I have no patience for it anymore.

So this is me. Erin. Age 17. Nice to meet you.

Dark Chocolate Chip Zucchini Bread {from scratch}

You know that feeling when you’re minding your own business, then all of the sudden you get a whiff of something that makes you so nostalgic your chest aches? Or so genuinely happy that a warm-fuzzy sensation passes through your entire body? Or just melancholy enough to lose your breath?

Personally, smell has always been my best emotion or memory-inducing sense. Any trace of pine trees and I’m nine years old again, prancing around the living room helping my mother decorate for the holidays while Amy Grant’s “Home for Christmas” CD plays in the background. Pumpkin spice and I’m 16, sipping coffee and meeting my best friends for the first time. Cherry blossoms and I’m 17, sitting in my favorite teacher’s classroom listening to her quirky anecdotes about totalitarian governments. Salty ocean breeze and I’m 22, being kissed under the night sky on an empty lifeguard tower.

I spent so much time in transition as a little girl—either between schools, or houses, or even friends—that smells became my way of making a connection; of determining what was a safe space versus what would trigger my anxiety-turned-daily-stomachache. I remember too my mother’s house having a very specific scent, so much so that I would bring some of the extra clothes I brought with me to bed at my dad’s house, shoving my face against the polyester fabric if only to keep her close to me when I couldn’t see her for days at a time. They smelled like Mom. Mom was my safe space.

Processed with VSCO with c1 presetI wanted to talk about my mom today because I am, in fact, sharing with you one of her recipes! From scratch of course, because she has more talent in the kitchen than I could ever hope for.

Mom’s zucchini bread has been a staple in our household for years, right up there next to strawberry jam. I swear every August we stockpile enough loaves in the garage freezer to last us through a nuclear winter—*cough* bad joke.

So in light of what was probably our 28th loaf to join with the others, I thought I’d share with you this little unofficial family tradition.

To start, you’ll want to cut up a full zucchini using a food processor. However I will warn that if your garden is anything like ours, there’s a slight chance your fruit will be larger than the average newborn.

(Also, fruit? Come on. This thing is totally a vegetable).

Processed with VSCO with c1 preset

Processed with VSCO with c1 preset

Processed with VSCO with c1 preset

Because this particular zucchini was so large, we started by slicing it into fourths, and then each fourth into more fourths, so the pieces would fit into the processor. Depending on what you’re using you can just play it by ear, although if you’re like us and using a circa-1983 (lol) Moulinex, I’d cut it into as thin of slices as you can.

Meanwhile, all of the ingredients (minus the zucchini and chocolate chips) are blended together—that includes eggs, sugar, flour, cinnamon, vanilla, baking soda, baking powder, oil (or applesauce if you’d like), and salt.

Start by creaming together the eggs, sugar, oil (or applesauce), and vanilla, then add the remaining dry ingredients.

Processed with VSCO with c1 preset

Once your batter is blended together evenly, slowly and gently keep the mixer on low while adding the zucchini shavings and semi-sweet chocolate chips.

I should also mention that this recipe makes two full loaves, so you will need two bread pans. When I’m not baking cookies and using the silicone baking mats, I like to use this no-stick vegetable oil cooking spray from Signature Kitchens (Safeway’s store brand I believe). Spray both pans generously, and then if you want to be like my mother, take a pinch of flour and spread it around the bottoms and sides of the pans, for extra anti-stick measures.

Processed with VSCO with c1 preset

Processed with VSCO with c1 preset

Bake both loaves at 350 F for about one hour. After they’re done and have cooled off a bit, gently remove them from the bread pans and slice…I usually like to make about 1/2 inch thick pieces. Bring them to your next potluck, family reunion, to the office staff room to share with colleagues, what have you.

I think little girl Erin would tell you that if her mother’s love had a taste, it might very well be this bread.

With a serving of peanut butter spread on top, of course.

Processed with VSCO with c1 preset

Dark Chocolate Chip Zucchini Bread

Ingredients

3 eggs

2 cups sugar

1 cup oil – or if you do like us, 1/2 cup oil and 1/2 cup plain applesauce

3-5 tsp vanilla

3 tsp cinnamon

3 cups flour

1 tsp salt

1 tsp baking soda

1 tsp baking powder

2 cup grated zucchini

1 cup semi-sweet chocolate chips (you can also use walnuts, blueberries, etc. here; whatever you’d like to add. It also tastes good plain).

Method

  1. Preheat oven to 350 F.
  2. Shred one full zucchini in a food processor until you have at least two cups’ worth of shavings.
  3. Cream together eggs, sugar, oil/applesauce, and vanilla.
  4. Sift remaining dry ingredients together—flour, baking soda, baking powder, salt, cinnamon—and add to creamed mixture.
  5. Slowly add the two cups of grated zucchini and semi-sweet chocolate chips/blueberries/walnuts/etc. with the mixer on a low setting.
  6. Bake in two bread pans at 350 F for one hour.

…and before you take your first bite, don’t forget the peanut butter.

xoxo,

Erin

Iced Cinnamon Bun Apple Pie

With August coming to a close, I’ve definitely been feeling the fall hype these days. For as long as I can remember, fall has been my absolute favorite season, and being from the Pacific Northwest it was definitely something I took for granted. For example, it never occurred to me that this season would not be a thing that existed until I relocated to Los Angeles back in 2012 and sweat my way through triple digits in October.

Needless to say now that I am back in Oregon I am totally ready for leaf piles, crisp air, college football, cozy sweaters, and pumpkin spice + apple cinnamon flavored everything that makes me feel all warm and fuzzy again.

But honestly the real reason I love fall so much is because by a weird (or perhaps coincidental?) twist of fate, the best things in my life have always happened as soon as the leaves began to turn.

In 2008, during our junior year of high school, my now-best friend welcomed me into her friend group when my mental health was declining and I felt like I had no one. And I promise I’m not being overdramatic when I tell you that those five girls would pull me out of my first bout of depression, inevitably saving my life.

In 2009 I met the teacher that would unknowingly alter the entire course of my life, inspiring me to study history and social science in college, which then pushed me into my career in nonprofit work and education.

In 2010 I moved to Seattle for my freshman year of college, met an entire floor’s worth of dorm-mates and, despite my social awkwardness, became blessed with even more life long friendships.

In 2013 I started dating the only boy I believe I ever really, truly loved. We had been infatuated with each other for about a year, so naturally that relationship was established the night he taught me how to play a song on the music room piano (we made out in the supply closet shortly after).

In 2014 I began my service year with AmeriCorps. I would “officially” get diagnosed with depression and an anxiety disorder that November, so the downward spiral was quick, but for those first few months, my 6th grade students were my angels and my teammates were my saviors.

In 2016 I got to take a last-minute all expenses paid trip to visit my family in New England, my favorite place in the world. (Yes, you best believe that the next time I move it’ll be back east).

You get the point.

Fall is magical. Just as Lorelai Gilmore believes in snow, I truly believe that when September comes around and the leaves begin to change color, all bets are off. Anything can happen.

And so, for just one night, I decided what would be better than to fill my kitchen with the smell of nostalgia yet eagerness for what’s to come. Of the living room as I curl up with book while rain pitter-patters against the window. Of Mom’s car as we drove to the pumpkin patch every year of my childhood, blasting 80’s pop music on the radio.

Tonight, I decided to bake an Iced Cinnamon Bun Apple Pie.

Recipe courtesy of Food Network Magazine.

Processed with VSCO with c1 preset

Like any pie recipe, we begin by lining a 9-inch pie plate with one piece of dough (I purchased these at Trader Joe’s, with whom I will unabashedly say I’ve been in a love affair for at least the past three years). Place back in the refrigerator until ready to assemble.

Processed with VSCO with c1 preset

Lay the remaining piece of dough on a lightly floured surface and spread butter evenly on top. Then combine the cinnamon and granulated sugar together in a small bowl before sprinkling evenly over the dough. I also found it helpful to lightly press the cinnamon and sugar to the dough to help it stick.

Processed with VSCO with c1 preset

Next comes the fun part…especially if you’ve never made cinnamon rolls before like yours truly. Rolling the dough into a tight log!

Processed with VSCO with c1 preset

Once you’ve strugglebus-ed your way through this step like I did, you’ll want to cut about an inch of dough off from both ends. (I ended up using these to fill in the middle of the top crust). Then—and I’d recommend using a sharper knife if you’re able—gently cut the remaining log into about 1/2 inch thick pieces.

After your cinnamon rolls—aka. the top layer of your pie—are complete, peel and thinly slice five apples (or about two pounds) for the filling. I used two Granny Smith, two McIntosh, and then one Gala just for kicks. Toss your apple slices in a large bowl with vanilla, lemon juice, granulated sugar, and cinnamon.

From my experience, when you’re done tossing the apples, drain out some of the leftover lemon juice to avoid a lot of liquid buildup in your finished product. I also added an extra teaspoon of sugar because sweet tooth.

Once you’ve transferred your apple slices into the dough-lined pie plate, place your cinnamon roll slices in as snug of a circle as possible over the apples (it’s okay if the individual rounds separate a little in the process).

Processed with VSCO with c1 preset

Almost there! Next, you’ll want to pinch your crusts together to the best of your ability, (it’s okay if they’re not totally pressed together…mine wasn’t), and brush the top of your unbaked pie with a single beaten egg.

Processed with VSCO with c1 preset

The original recipe calls for a 50 minute baking time at 400 F, but my oven runs a little warm so my pie was nice and golden brown after about 40 to 45. Either way, that’s plenty of time to squeeze in one more episode of Scandal.

Once your pie is done and cooled off a bit, if you want to give it a little twist you can drizzle a mixture of milk and confectioners’ sugar over the top, (I used Lactaid since regular milk is harder on my lactose intolerance).

Et voilà!

Processed with VSCO with c1 preset

…and then if you’re a bit of a beer snob like me you celebrate your accomplishment with a nice Hop Valley brew.

Processed with VSCO with c1 preset

Iced Cinnamon Bun Apple Pie (from Food Network Magazine)

Ingredients

2 9-inch refrigerated pie shells

All-purpose flour, for dusting

2 tablespoons unsalted butter, at room temperature

1/2 cup granulated sugar

1 1/8 teaspoons ground cinnamon

5 assorted apples (such as Granny Smith, McIntosh, etc.)

Juice of 1 lemon

1 teaspoon vanilla extract

1 large egg, lightly beaten

2/3 cup confectioners’ sugar

2 tablespoons milk, plus more if needed (again I used Lactaid so feel free to experiment here)

Method

  1. Place a baking sheet in the oven and preheat to 400 F. Line a 9-inch pie plate with 1 piece of dough; refrigerate until ready to assemble.
  2. Make the cinnamon-roll crust. Lay remaining piece of dough on lightly floured surface and spread butter evenly on top.
  3. Combine 1/4 cup granulated sugar and 1 teaspoon cinnamon in a small bowl; sprinkle evenly over butter, then gently press with your fingers to help the mixture adhere.
  4. Roll pie dough into a tight log. Trim and discard about 1 inch from both ends, and then cut the remaining log crosswise into 1/2-inch-thick rounds.
  5. Peel and thinly slice apples. Toss with lemon juice, vanilla and remaining 1/4 cup granulated sugar and 1/8 teaspoon cinnamon in a large bowl. Drain excess lemon juice if necessary. Transfer to dough-lined plate.
  6. Place cinnamon roll slices in as snug of a circle as possible over apples (it’s okay if the individual rounds separate a little in the process), resulting in a 9-inch round.
  7. Pinch top and bottom crusts together; fold the overhanging dough under itself and crimp as desired. Brush with beaten egg.
  8. Set pie on hot baking sheet in oven; bake until crust is golden brown and filling is bubbling, about 50 minutes. (Tent loosely with foil if top browns too quickly).
  9. Transfer to a rack to cool slightly.
  10. Optional: Whisk confectioners’ sugar and 2 tablespoons milk in small bowl until smooth. Drizzle evenly over pie.

Enjoy a slice with some whipped cream, a scoop of vanilla ice cream, or in the company of loved ones who may or may not be surprised that you managed to bake a pie without burning the house down.

YOU DID IT!


xoxo,

Erin


Welcome!

Hello everyone! For those of you who don’t already know me my name is Erin, and this is the result of about a year of contemplation on whether or not I should start a food blog. Well, more like “dessert” blog because, you know, specifics.

I have been blogging on and off throughout most of my adult life, either on my other WordPress site (which you can also find in the top menu) or in the form of Facebook posts (lol), and usually having to do with mental health, politics, LGBT+ issues—because {disclaimer number one: I’m queer as hell}—or just whatever passion project suits my fancy at the time.

Needless to say, I have a tendency to be much more articulate in writing than I am in real life conversation.

The idea for a food blog came to me about a year ago when I moved back to Oregon and started baking and perusing Pinterest recipes a lot more, because that’s what you do when you through a brief period of unemployment. For a while I hesitated to experiment, because a) I didn’t want to set my mother’s kitchen on fire, and b) the only time my perfectionist “Type A” personality ever comes out is when I fully invest in something. So if I’m baking a cake, I want it to taste good. Delicious. Fantastic, even. At that point in my life I knew enough about myself to recognize that if I had baked one shitty cake, I would have given up on the hobby altogether. No mistakes allowed.

Have I mentioned my generalized anxiety disorder yet? Mild OCD? Moderate depressive disorder? Yeah, it’s a fun time.

Anyway, once 2017 rolled around I had gotten enough feedback on my baked goods that I decided to let myself mix things up a bit. I would take a Pinterest recipe and wonder how I could make it vegan.

{Disclaimer number two: I am technically lactose intolerant, so some of my recipes will be dairy-free and/or vegan}

{Disclaimer number three: This is not going to be a strictly vegan food blog because let’s face it I love butter too much to ever give it up completely}

If that would taste good with mint flavoring. If this would be better with blueberries instead of strawberries. If I could turn that pumpkin muffin recipe into a doughnut hole recipe instead. You get the trend.

I gave myself the freedom to let the hobby become something more, and permission to invest in a positive relationship with food.

I will say though, I have written about my past relationships with food before, because it has without a doubt played a role—if not directly shaped—the nature of my mental illness. For the sake of detail, but also brevity, I’ll share a snippet of my story. 

When I was a little girl, starting at around the age of seven, my yet-to-be-diagnosed anxiety manifested itself as chronic stomachaches. Not like “flu, throwing up” stomachaches, but enough of one to leave me too uncomfortable to eat or really function normally. Because of this, I was a really skinny kid, and picky eater, until around the 7th grade. I avoided sugar like the plague and would spiral into a near-panic attack if I so much as looked at more than two lollipops at a time; I had witnessed firsthand my friends and cousins get sick from eating too much sugar, so I was convinced if I ate any at all my stomach would kill me.

The stomachaches stopped when I was 12 and moved in with my mother full time. At the time I couldn’t see the correlation, since the concept of adolescent anxiety and anxious behaviors was still completely foreign to me. All I knew at the time was that all the foods I supposedly “couldn’t” eat as a kid, I could eat now. I could go out to McDonalds with my best friend and get a large fry. I could eat two bowls of ice cream in one day. I could finish off the batter from my mom’s oatmeal cookie recipe.

I think it probably goes without saying that the next thing I realized was that my body was also capable of this thing called weight gain.

In high school, the scale tipped. Pun intended. Whatever eating habits or lack thereof I had in elementary/middle school shifted to the complete opposite end of the spectrum. I was eating too much.

{Disclaimer number four: when I say things like “too much” I mean for my body and my own health. It is never my intention to make anyone feel like I’m projecting onto their body. I want you to do what is best and healthiest for your body, whatever that means}

Food became my go-to for any feeling I experienced. Joy, excitement, and happiness, all the way down to sadness, anger, and those feelings I couldn’t describe that years later would be identified as depression.

By the age of 15, I had developed a binge eating disorder.

I remember feeling so ashamed every time I opened the cabinet or refrigerator. I knew my mom noticed how quickly food was disappearing in the house, and secretly I was humiliated, but I couldn’t stop. It got to the point where the only items of clothing I had that fit were a baggy pair of jeans, a few t-shirts, and my black fleece North Face jacket. I wore that North Face jacket like a life vest for almost two years and even when it was 80 degrees, desperately trying to hide what deep down I knew everyone saw regardless.

Still, it was never enough to make me stop. Not even a half dozen nutritionists and dietitians could make me stop. The feeling of being so full I was in physical pain became my punishment.

I needed help, but I had no idea who to tell or even what to say. I didn’t even know what I had was an actual disorder. I thought it was only an eating disorder if you stopped eating altogether.

Over the course of a year I quit all sports and extracurriculars, and gained about 30 pounds. The only thing that remained the same were my grades—I was a straight-A student. Despite everything, I was never not a straight-A student. School and studying was the one thing I could control, if only so no one would ever really know what was going on with me at home, or on the inside.

It took until my junior year of college to lose the weight I had gained from my eating disorder. Thankfully the summer before that I had worked a job that scared me straight, for lack of a better expression. I worked on a farm just north of my hometown, driving a combine for 12 hours a day, and the sheer amount of sitting made me realize that if I didn’t cut back, if I didn’t seek help and seek out nutritious habits, I could seriously hurt myself.

Now, at 25 years old and a weight where I feel healthiest, I am giving myself permission to invest in a positive relationship with food.

I want to use this space to share my love of baking, and how I came to love baking (and, not going to lie, watching Scandal on Netflix in the kitchen), but also shed light on the fact that this connection is not necessarily easy for everyone. This is a relationship I scratched and clawed my way to the surface to achieve, and worked my ass off for.

Mental illness is a bitch, and can absolutely seep into the physical aspects of your life. This I can say without a shred of doubt, and if this is what I can do to help make sure that one less young kid feels scared or alone, then this is exactly what I will do.

Welcome to A Teaspoon of Recovery everyone.


All my love and gratitude,

Erin